


Table of contents
- Why use Node.js?🤔
- What Can Node.js Do?🙋♀️
- What is a Node.js File?🤔
- What is Node.js?
- Node.js Architecture:
- ⛳Node.js works
- How to Install Node js?👩💻
- ⛳Node Module System
- ⛳Global Object
- ⛳Loading a Module
- ⛳Module Wrapper Function
- ⛳Path Module
- ⛳OS Module
- ⛳File System Module
- ⛳Events Module
- ⛳Event Arguments
- ⛳Extending EventEmitter
- ⛳HTTP Module
- 🎯 Wrap Up!!
Hello developers! In this blog, we are going to embark on an exciting journey to learn about Node.js and its applications through practical examples. This hands-on approach will deepen our understanding and make the learning process fun and engaging. Let's get started!

Why use Node.js?🤔
Node.js uses asynchronous programming!
it makes full-stack development easier due to language sharing across the stack. Also, app development is rapid in this runtime environment, especially because the largest software library registry in the world is hosted by it. In other words, whenever you encounter a problem, you will likely be able to find the solution in the library.
Last but not least, did you know that some of the most popular apps use Node.js at their core? This has allowed them to be able to handle millions of visits and keep developing their features over time.
Node.js runs single-threaded, non-blocking, asynchronous programming, which is very memory efficient.

What Can Node.js Do?🙋♀️
Node.js can generate the dynamic page content
Node.js can create, open, read, write, delete, and close files on the server
Node.js can collect form data
Node.js can add, delete, and modify data in your database
What is a Node.js File?🤔
A typical event is someone trying to access a port on the server
Node.js files must be initiated on the server before having any effect
Node.js files have the extension ".js"
Node.js files contain tasks that will be executed on certain events
What is Node.js?
Node.js is a JavaScript runtime built on Chrome's V8 JavaScript engine.
It allows server-side execution of JavaScript code.
It uses an event-driven, non-blocking I/O model, making it efficient for real-time applications.
Node.js provides a rich library of various JavaScript modules which simplifies the development of web applications.
It can be used for various purposes such as building server-side web applications, network applications, and command-line tools.
Node Package Manager (NPM), the largest library of open-source packages, is included with Node.js installation.
Node.js has a large and active community, making it easy to find support and resources.

Node.js Architecture:
V8 Engine: Node.js is built on the V8 JavaScript engine from Google, which compiles JavaScript code into machine code for fast execution.
Libuv: Libuv is a library for asynchronous I/O, which is used by Node.js for handling and managing events and handling system calls.
JavaScript Layer: This layer is responsible for implementing the core features of Node.js, such as modules, events, and the Node.js runtime.
C++ Addons: This layer allows developers to write native C++ code and use it in their Node.js applications.
HTTP/TCP/DNS: These are the network protocols and services used by Node.js for handling network communication.
File System: This layer provides access to the file system, allowing Node.js applications to read and write files.
Package Manager: Node.js includes the Node Package Manager (NPM), which allows developers to easily manage dependencies and install packages for their applications.
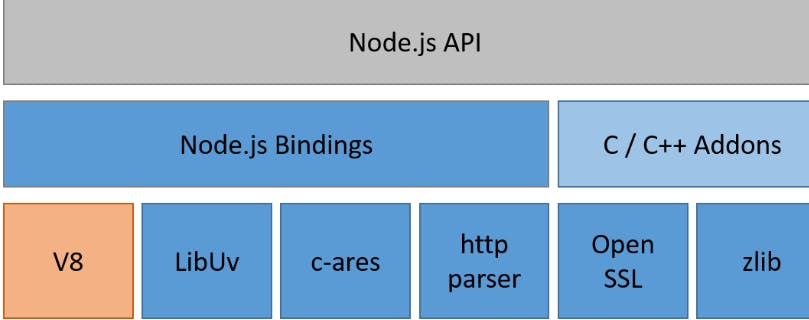
Note: The exact architecture may vary slightly depending on the version and distribution of Node.js.
⛳Node.js works
Parsing JavaScript code: The V8 JavaScript engine compiles and executes JavaScript code.
Handling events: Node.js uses an event-driven, non-blocking I/O model, where events are triggered by user actions or system events.
Using callback functions: When an event occurs, a callback function is executed to handle the event. This allows Node.js to handle multiple events simultaneously without waiting for any one event to finish.
Maintaining an event loop: The event loop continually listens for new events and executes the corresponding callback functions.
Using the Libuv library: Libuv is used for handling and managing events and for making system calls, such as file I/O and network communication.
Implementing the Node.js API: The Node.js API provides a rich set of modules and functions for building server-side applications, network applications, and command-line tools.
Communicating with the operating system: Node.js uses the operating system to handle low-level tasks, such as reading and writing files, and handling network communication.
Managing packages and dependencies: Node.js includes the Node Package Manager (NPM), which allows developers to easily manage dependencies and install packages for their applications.
How to Install Node js?👩💻
Installing Node.js can be done in different ways, depending on the operating system you are using:
Windows:
Download the Windows installer from the official Node.js website.
Run the installer and follow the on-screen instructions to complete the installation process.
Verify the installation by opening the Command Prompt and running the following command:
node -v. This should display the version number of Node.js.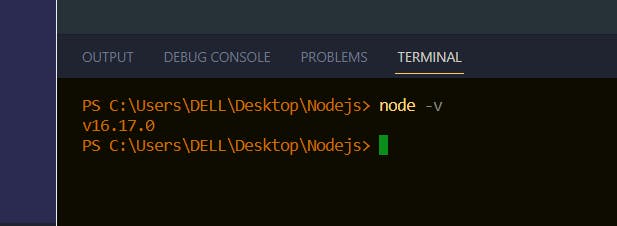
I am using Windows and as shown in the above image, please check my Node.js version is v16.17.0
MacOS:
Download the MacOS installer from the official Node.js website.
Run the installer and follow the on-screen instructions to complete the installation process.
Verify the installation by opening Terminal and running the following command:
node -v. This should display the version number of Node.js.
Linux:
Install Node.js using the package manager for your Linux distribution. For example, on Ubuntu, you can run the following command:
sudo apt-get install nodejsVerify the installation by running the following command in Terminal:
node -v. This should display the version number of Node.js.
Note: It is recommended to install the latest stable version of Node.js, which can be found on the official Node.js website.

First Node Program:-
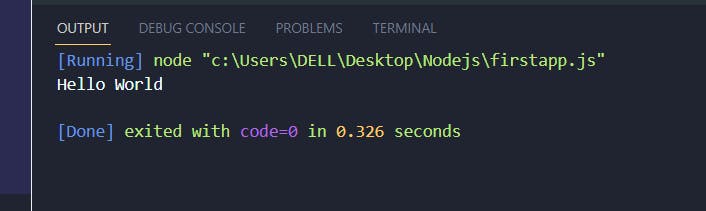
A simple first Node.js program could be a program that prints "Hello World" to the console:
console.log("Hello World");
To run this program, you need to create a new file(firstapp.js) with a .js extension and save the above code in it. Then, open your terminal or command prompt, navigate to the directory where the file is saved, and run the following command:
⛳Node Module System
Node.js has a modular architecture, which means that functionality is divided into reusable, self-contained modules. Each module performs a specific task and can be included in other modules as needed.
The Node.js module system provides several benefits, including:
Code Reusability: By breaking down your application into smaller, reusable modules, you can reduce the amount of code you need to write and make it easier to maintain your code.
Improved Organization: Modules help you to organize your code into separate, logical components, making it easier to understand and maintain.
Improved Performance: Modules can be loaded as needed, which can improve the performance of your application by reducing the amount of memory used.
To create a new module in Node.js, you can use the module.exports object. For example, consider the following code:
// module.js
exports.sayHello = function() {
     console.log("Hello coders");
};
This code defines a module named module.js that exports a single function, sayHello(). To use this module in another file, you can use the require() function:
// app.js
const myModule = require("./module");
myModule.sayHello();
This code loads the module.js module using the require() function and assigns the exported value to the myModule variable. The code then calls the sayHello() function from the loaded module, which writes "Hello coders" to the console.
In this example, the module.js module provides a specific piece of functionality that can be reused in other parts of your application. By organizing your code into modules, you can create a more maintainable, scalable, and modular application architecture.
⛳Global Object
In Node.js, the global object is a top-level object that provides access to several important global variables and functions. The global object is available in every module and can be used to access the built-in modules, as well as variables and functions that are defined globally.
For example, consider the following code:
// app.js
global.message = "Hello World";

console.log(message);
In this example, the code creates a global variable named message and assigns it the value "Hello World". The code then uses the console.log() function to write the value of the message variable to the console.
Note that while the use of global variables is generally discouraged, the global object is an exception. The global object is intended to be used as a mechanism for sharing data between modules in a Node.js application.
It is important to be mindful of the scope of your variables and to use the global object only when necessary. In general, it is better to use module-level variables and functions, which can be exported and imported as needed, to organize your code and reduce the risk of naming conflicts.

⛳Loading a Module
To load a module in Node.js, you use the require() function. The require() function takes a single argument, which is the path to the module you want to load. For example
const myModule = require("./module");
In this example, the require() function loads the module.js module from the current directory and assigns the exported value to the myModule variable.
You can also use the require() function to load built-in Node.js modules and third-party modules. For example:
const fs = require("fs");
const express = require("express");
In these examples, the require() function loads the fs built-in module and the express third-party module, respectively.
Once you have loaded a module using the require() function, you can access the exported values and functions as properties and methods of the loaded module. For example:
const myModule = require("./module");

myModule.sayHello();
In this example, the code calls the sayHello() function from the myModule object, which was exported from the module.js module. the same example explain above also
⛳Module Wrapper Function
The module wrapper function is a function that wraps every module in Node.js. It provides a closure for the module code and allows the module to access its own exports and the require() function. The signature of the module wrapper function looks like this:
(function (exports, require, module, __filename, __dirname) {
  // module code
});
Here's an example of how the module wrapper function can be used to define a simple module:
// module.js
(function (exports, require, module, __filename, __dirname) {
  exports.sayHello = function() {
    console.log("Hello");
  };
});
In this example, the module code is wrapped in a function that takes 5 arguments:
exports: an object that will be returned by therequire()function when the module is loaded.require: a function that allows the module to load other modules.module: an object that represents the current module.__filename: the absolute path of the current module file.__dirname: the absolute path of the directory containing the current module file.
The module code then uses the exports object to add a function named sayHello to the module's exports. When the module is loaded using the require() function, the sayHello function will be available to the code that loaded the module.
It's worth noting that, in practice, most Node.js modules don't use the module wrapper function directly. Instead, they use the exports and module.exports objects to define their exports, as shown in a previous answer. However, understanding the module wrapper function is important for understanding how modules in Node.js work.

⛳Path Module
The path module is a built-in module in Node.js that provides utilities for working with file and directory paths. With the path module, you can:
Join multiple paths into a single path.
Normalize a path, resolving '..' and '.' segments.
Get the base name and extension of a file path.
Determine the relative path between two file paths.
Convert between absolute and relative paths.
Here's an example of using the path module to join two paths:
const path = require("path");

const filePath = path.join(__dirname, "file.txt");
In this example, the path.join() function is used to join the current directory (__dirname) and the file name "file.txt" into a single file path.
You can find more information about the path module and its functions in the Node.js documentation

⛳OS Module
The os module is a built-in module in Node.js that provides information and utilities for working with the underlying operating system. With the os module, you can:
Get information about the host computer, such as the number of CPUs, the amount of free memory, and the hostname.
Convert values between different number formats, such as big and little endian.
Check if a user has a specific permission, such as the ability to read or write a file.
Here's an example of using the os module to get information about the host computer:
const os = require("os");

console.log("CPUs:", os.cpus().length);
console.log("Free memory:", os.freemem(), "bytes");
console.log("Hostname:", os.hostname());
In this example, the os module is required and the number of CPUs, amount of free memory, and hostname are logged to the console.
You can find more information about the os module and its functions in the Node.js documentation

⛳File System Module
The fs module is a built-in module in Node.js that provides functions for working with the file system. With the fs module, you can:
Read and write files.
Create, delete, and modify files and directories.
Access information about files and directories, such as file size, modification time, and ownership.
Watch for changes in the file system and respond to them.
Here's an example of using the fs module to read a file:
const fs = require("fs");

fs.readFile("file.txt", "utf8", (err, data) => {
  if (err) {
    console.error(err);
    return;
  }

  console.log(data);
});
In this example, the fs module is required and the fs.readFile() function is used to read the contents of a file named "file.txt". The utf8 encoding is specified, so the contents of the file will be returned as a string. If an error occurs, it will be logged to the console.
You can find more information about the fs module and its functions in the Node.js documentation: nodejs.org/api/fs.html
⛳Events Module
The events module is a built-in module in Node.js that provides support for event-driven programming. With the events module, you can:
Create and emit custom events.
Respond to events by registering event listeners.
Remove event listeners when they are no longer needed.
Here's an example of using the events module to create a custom event:
const EventEmitter = require("events");

class MyEmitter extends EventEmitter {}

const myEmitter = new MyEmitter();

myEmitter.on("event", () => {
  console.log("An event occurred!");
});

myEmitter.emit("event");
In this example, the events module is required and a custom event emitter class named MyEmitter is created by extending the EventEmitter class. An instance of the custom event emitter is created and an event listener is registered for the "event" event. The emit method is then called to trigger the "event" event, causing the registered event listener to log a message to the console.
You can find more information about the events module and its functions in the Node.js documentation: nodejs.org/api/events.html

⛳Event Arguments
Event arguments are data that can be passed to an event listener when an event is emitted. In Node.js, you can pass any type of data as arguments to an event, including numbers, strings, objects, and arrays.
Here's an example of passing event arguments to an event listener in Node.js:
const EventEmitter = require("events");

class MyEmitter extends EventEmitter {}

const myEmitter = new MyEmitter();

myEmitter.on("event", (a, b) => {
  console.log(a, b, this);
});

myEmitter.emit("event", "a", "b");
In this example, the events module is required and a custom event emitter class named MyEmitter is created by extending the EventEmitter class. An instance of the custom event emitter is created and an event listener is registered for the "event" event, which takes two arguments, a and b. The emit method is then called to trigger the "event" event, passing the values "a" and "b" as arguments to the event listener. The event listener logs the values of a, b, and this to the console.
You can pass any number of arguments to an event listener, and you can use the arguments in the event listener to customize its behavior.
⛳Extending EventEmitter
The EventEmitter class in the events module can be extended to create custom event emitters in Node.js. This allows you to create custom objects that emit events and respond to events in your Node.js applications.
Here's an example of extending the EventEmitter class:
const EventEmitter = require("events");

class MyEmitter extends EventEmitter {}

const myEmitter = new MyEmitter();

myEmitter.on("event", (a, b) => {
  console.log(a, b, this);
});

myEmitter.emit("event", "a", "b");
In this example, the events module is required and a custom event emitter class named MyEmitter is created by extending the EventEmitter class. An instance of the custom event emitter is created and an event listener is registered for the "event" event, which takes two arguments, a and b. The emit method is then called to trigger the "event" event, passing the values "a" and "b" as arguments to the event listener. The event listener logs the values of a, b, and this to the console.
By extending the EventEmitter class, you can create custom objects that emit and respond to events in a manner that is similar to the built-in objects in Node.js that emit events, such as streams and timers. This allows you to build event-driven applications that are more flexible and scalable.
⛳HTTP Module
The http module in Node.js provides an HTTP server and client for building web applications. The http module is built-in, so you don't have to install it, and you can use it to create an HTTP server and make HTTP requests to other servers.
Here's an example of creating an HTTP server using the http module:
const http = require("http");

const server = http.createServer((req, res) => {
  res.writeHead(200, {"Content-Type": "text/plain"});
  res.end("Hello World\n");
});

server.listen(3000, () => {
  console.log("Server running at http://localhost:3000");
});
In this example, the http module is required and the createServer method is used to create an HTTP server. The createServer method takes a callback function that is called for each incoming request. The callback function has two arguments, req and res, which represent the request and response objects, respectively. The writeHead method is used to write the HTTP response header, and the end method is used to write the response body. The HTTP server is then started by calling the listen method and passing the port number 3000.
Here's an example of making an HTTP request using the http module:
const http = require("http");

http.get("http://www.example.com", (res) => {
  res.on("data", (chunk) => {
    console.log(chunk.toString());
  });
});
In this example, the http module is required and the get method is used to make an HTTP GET request to http://www.example.com. The get method takes a URL and a callback function that is called when the response is received. The callback function has one argument, res, which is the response object. The on method is used to register an event listener for the "data" event, which is emitted when data is received from the server. The event listener logs the response data to the console.
The http module provides a simple and flexible way to create and consume HTTP services in Node.js. It is widely used for building web applications and for making HTTP requests to other servers for purposes such as data retrieval, APIs, and microservices.

🎯 Wrap Up!!

Thank you🤓 for taking the time to read my blog on the basics of Node.js. If you found the information helpful, I would greatly appreciate it if you could share it with others in your professional network. You can easily spread the word through social media by clicking the share buttons below or simply copying and pasting the link. Your support helps me continue creating valuable content for you and others in the community. Thank you again for your help😍!